Introduction
This post is a sequel of the previous post, which demonstrated the relationship of classifiers, routing modules, and nodes:
- What are they, their purposes, their relationship,
- How to configure them conceptually, and
- Using $ns node, how a default classifier, namely “classifier_”, is created and put in a node.
- Putting a routing modules rtnotif_ and ptnotif_ in a node using "$ns node"
- Details of classifiers
- 2 common ways to implement routing modules: rtnotif_ and ptnotif_
What’s in This Post
So far, what we have looks like the figure below.
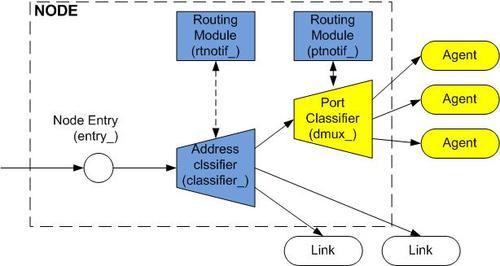
This post will show you how to put yellows box, port classifier and agents, to a node.
Routing and Transport Layer Bridge in a Computer
When a packet arrives your computer, your computer will check the IP address. If the IP Address is for itself, it will deliver the packet to the attach transport layer protocol (e.g., your web browser may use TCP port 49175). Otherwise, it will forward the packet according to the routing table.
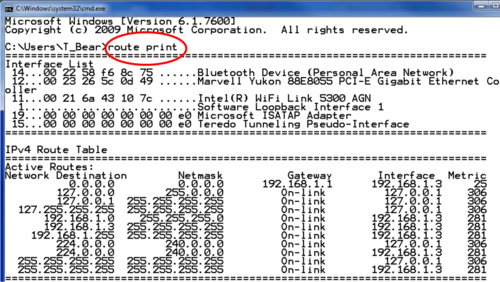
Note: In windows, you can use the command
route print
to show routing table. Here is the example result.
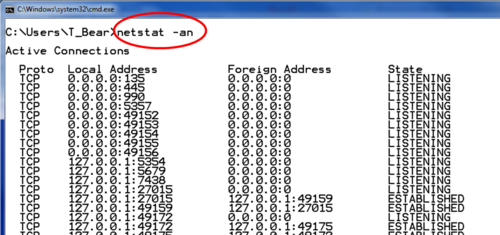
Also, you can use the command
netstat -an
to show the transport layer port. Here is the example result.
What about NS2
Again, in NS2, a node can be a router or a computer. But it doesn't matter which one you are considering. NS2 makes no difference between these two types. A node is able to forward packets based on destination address and transport layer port indicated in the packet header.
NS2 uses class Agent as a transport layer protocol (In fact, class Agent is used to create and destroy packets, but we'll talk about that later). So, our objective is to
1. Create agents $a0 by using
>> set $a0 [new Agent/TCP]
2. Attach the created agent to the node $n0 by using
>> $ns attach-agent $n0 $a0
It is the latter step which is a bit complicated. So I better explain.
Key steps.
So I am going to use the previous notation. Please see [ here ] before proceeding.
I. [Tclscript] $ns attach-agent $n0 $a0
II. [f_LT] Simulator::attach-agent{ node agent }
-> [1] $node attach $agent: [see step III.]
III. [f_NT] Node::attach { agent { port "" } }
-> [1] set dmux_ [ new classifier/Port ]: Create a port classifier
-> [2] $self add-route $address_ $dmux_: [see Step IV]
-> [3] set port [ $dmux alloc-port [ [ Simulator instance ] nullagent ] ]:
-> [3.1] [ Simulator instance ] nullagent ] returns the null agent which is used to destroy packets
-> [3.2] $dmux alloc-port [...]:
- Store the agent from III.3.1 in the next available slot of the classifier $dmux
- Return the associated port (or slot) number.
- Note: In port classifiers, the slot number is the same as the port number
- For more information about classifier, plese see [this link]
-> [3.3] $port [...] stores the value returns from III.3.2 in a local variable $port
-> [4] $agent set agent_port_ $port: Store the allocate port number $port into the instvar $agent_port_ of the input $agent
-> [5] $self add-target $agent $port: Tell the Node that the $agent is attached to port number $port [see Step V]
IV. [f_NT] Node::add-route { dst target } (from III.2)
-> $rtnotif_ add-route $dst $target: From the above figure, $rtnotif_ is a routing module responsible for packet routing. In this particular context, $dst is the node address and $target is $dmux_ (see III.2). Therefore, this statement tells $rtnotif_ that any packet destined to the current node should be forwarded to $dmux_. Again, we do not configures classifiers directly. Routing module is the single point of classifier management, and we shall configure classifiers through routing modules only. For more information, please read [ this link ].
V. [f_NT] Node::add-target { agent port } (from III.2)
-> Similar to add-route, instproc add-target tells the node that packet whose port is $port should be forwarded to the agent $agent.
The job of classifying and forwarding packets based on the transport layer port is attributed to port classifier, which NS2 calls a "demultiplexer". Again, we do not configure the demultiplexer directly but does so through a routing module $ptnotif_
As show in [ this link ], $ptnotif_ has different implementation than $rtnotif_. It is based on list (i.e., array), not pointers. So what you see in this step is
foreach m [ $self set ptnotif_ ] {
$m attach $agent $port [see Step VI]
}
VI. [f_RT] RtModule::attach { agent port } (From Step V)
-> [1 (Sending Agent)] $agent target [ [ $self node ] entry ]
A sending agent creates a packet and sends the created packets to the node. Then the node looks at the destination address in the packet header and forward the packet accordingly.
[ [ $self node ] entry ] return the entry point of the node associated with the routing module under consideration
So the entire statement says that "set the target of the agent to be the node entry". The node will later pass it to its address classifier during normal packet forwarding mechanism.
-> [2 (Receiving Agent)] [ [ $self node ] dmux ] install $port $agent
If $agent is a receiving agent, the packet will come from the node, pass through the address classifier and the demultiplexer, and arrive $agent.
What we have to do here is to configure the demultiplexer obtained from [ [ $self node ] dmux ]. The entire statement installs $agent in the slot number "$port" of the demultiplexer. (For the detail of object installation in a classifier please see [this link] ).
Wrap-Up
Long, isn't it. Well, it's quite complicated. But that's how it works in NS2. For now, I think it is quite enough for you to get yourself working in an NS2 node. Next time you'd like to have a node classify packets based on your own criteria, follow the instruction in this series. That way you can make your NS2 code neat and compatible.
I do left out the details of route configuration. It is quite similar to agent attachment. You can research about it yourself. But if you'd like me to talk about it. Please let me know.
Comments? Facebook post? Please let me know. I appreciate the comments or questions you all have.
==============================================================
For more information about NS2, see Chapter 6 in the following book from Springer:
T. Issaraiyakul and E. Hossain, “Introduction to Network Simulator NS2”, Springer 2009.
You may also find lecture notes and other resource at the following website: http://www.ece.ubc.ca/~teerawat/NS2.htm
No comments:
Post a Comment